Aka ‘Cracking the WIP’
It’s hard to talk about Kanban for more than 5 minutes without some mention of a WIP limit. Short for Work-In-Progress, limiting WIP is an important mechanism in controlling the flow of work through a delivery pipeline.
However, confusion often sets in early on the journey of flow management. How do you begin? What does good look like? When I give the official advice of ‘start with what you have, and go from there’, I’m often met with puzzle looks.
The purpose of this article is to help people get a better understanding of WIP, and to provide a tangible method to get started with WIP limits.
What is WIP?
One of the key principles of Kanban is the concept of flow management. Specifically, by implementing policies in our delivery workflow to control the volume of work at different gates we can significantly increase the predictability of work.
Having a Work In Progress metric in place can provide immediate benefits on its own, especially when measured over time. Does your teams’ workload fluctuate significantly? Is it seasonal?
If we think of the amount of work in the delivery pipeline as the overall customer demand at a point in time, then a WIP limit is the opposite; the capacity of the system (not necessarily the team itself!) to deliver at that same point. Knowing that demand often exceeds capacity in most delivery systems, we must introduce policies to ensure that excess demand is triaged and prioritised properly in order to not overwhelm the system.
What does a WIP limit achieve?
Often in the world of agile there is too much emphasis on cycle time, or speed-to-market, instead of emphasising other equally important factors such as predictability or quality. Ask yourself, would you rather place a $1000 bet with a 50% chance of turning it into $3000, or would you rather place the same bet if there was a 100% guarantee you’d make $2000? You can plan and forecast easily in the latter scenario, but there is a 50/50 chance you’d need to undertake replanning in the former example.
Ultimately speed, productivity and predictability are all intertwined, and if you follow Little’s Law then you’ll know that you can’t effect one variable with affecting the others. Although the common consensus is that manufacturing principles don’t necessarily translate like-for-like in the complex knowledge-working industry of IT, we can safely say that the basic principles of Little’s Law still apply.
Little’s Law (for Kanban)
WIP = Throughput * Lead Time
Where:
-
- WIP = average number of work items in process
-
- Throughput = average delivery rate
-
- Lead Time = average time an item spends from the point of commitment to the point of delivery
Therefore, by limiting the Work-In-Progress, we can directly increase the predictability of the system, and also indirectly improve the speed and throughput of the system also.
Also, WIP limits serve a second purpose. Not only can they improve the performance of the system, as mentioned above, but it also intentionally ‘stresses’ the delivery workflow. For instance, if you set your WIP limit to be 80% of the average work-in-progress, then 20% of the time you are forcing your team to adopt certain policies that they might not follow otherwise. We can exploit this behaviour to make cultural improvements also.

Again, it is up until this point where the theory usually ends in the Kanban world. Because WIP is contextual it is nigh-impossible to create an official ‘universal’ method of WIP limit calculation.
However, I’ll try and provide the next best thing; an unofficial ‘starter guide’ to help you along your journey. Below is the typical 5-step approach I take to get from point A to point B.
You’ll notice I talk about this method as an ‘experiment’ because it is just that; a scientific guess. In the same way that your typical chemistry experiment has a hypothesis, method, results and conclusion, so too must we start off with an educated guess and measure how close our assumptions are to get to the intended goal.
1. Understand and define your goal
Don’t skip this first step, as there are a bunch of assumptions we need to clarify from the get-go!
As mentioned before, we are using WIP limits to strike a balance between supply (system capacity) and demand (customer requests). However, there are multiple ways to define ‘capacity’, and therefore our WIP limit goal can vary accordingly.
In my experience, there are three different types of capacity, and therefore three different potential goals to reach with a WIP limit.
Select the goal (A,B or C) from the below list that resonates with you the most:
Goal A: Limit the number of work items to increase performance
“We want to organise the work, not the people.”
This is the ‘purist’ Kanban definition of capacity. This scenario acknowledges that a high number of In Progress items can place continual stress on your delivery pipeline, creating bottlenecks of work.
Performance-based WIP focuses on limiting In Progress items such that the system is stressed occasionally without overwhelming the system.
Goal B: Limit the number of work items to increase collaboration
“We want to organise the work, factoring in how many people we have rostered at the time.”
This is the more traditional view of capacity, but with a slight twist. A high number of In Progress items can make it difficult for team members to find opportunities to cross skill together.
Collaboration-based WIP focuses on limiting In Progress items below the number of people in your team.
Goal C: Limit the number of work items to increase mindfulness
“We want to organise the work, such that each person is not individually overwhelmed by their workload.”
The final potential goal, with a big emphasis on mental workload and stress management. A high number of In Progress items can be overwhelming to your team members.
Mindfulness-based WIP focuses on limiting In Progress items proportional to the number of people in your team.
2. Gather what data you can
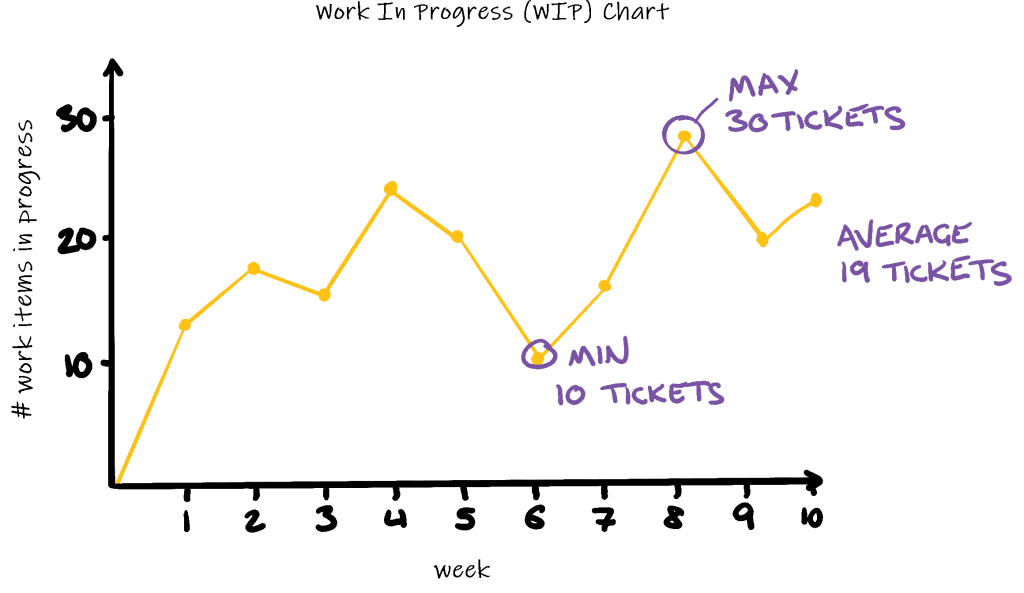
To be able to identify a suitable starting WIP limit, we need to take a look at the history of the team (or system) up to this point. Ideally this would involve quantifying the data in some way, which should be possible provided you use a digital board such as Jira or Trello. If not, then anecdotal evidence will suffice, but your main objective will quickly turn to gathering unbiased evidence.
Once you have a dataset, whether it be real or estimated, we need to capture some quick stats. Good questions to ask here include:
-
- What are the minimum and maximum WIP limits we’ve observed?
-
- What trends can we identify? Is there a seasonal demand, or does the demand perhaps have a more unpredictable burst-like pattern?
-
- What are the stories behind these significant events? Can we trace the demand back to a specific root cause or origin that can help us in the future?
Once we’ve thoroughly reviewed our past, it’s time to make a call about the future.
3. Make some big choices
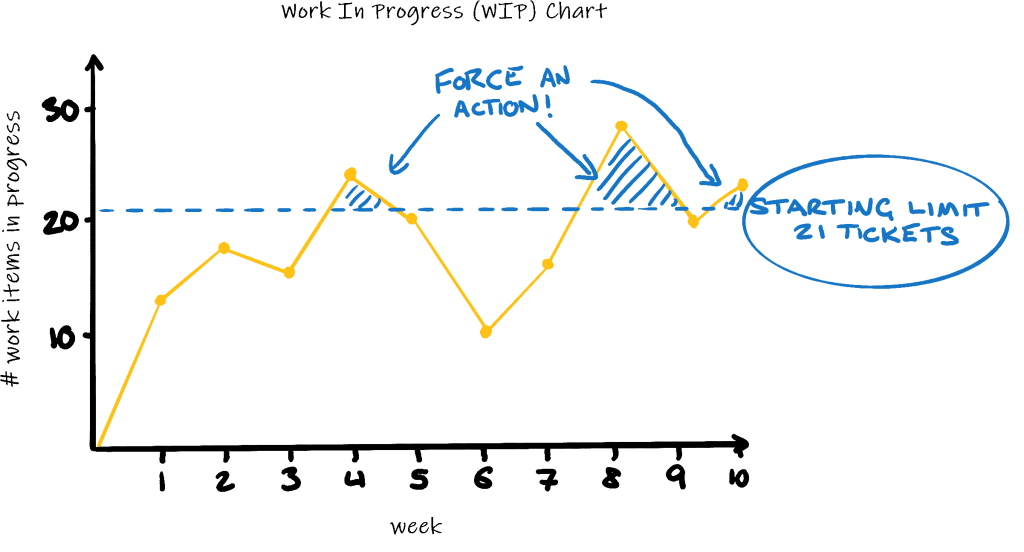
As I mentioned before, the primary mechanism provided by a WIP limit is additional ‘stress’ on the system. In other words, we are trying to force a response or policy to be enacted when a certain threshold has been reached.
So rather than trying to identify a WIP limit right off the bat, we can instead approach it from the other direction. How often do we want the WIP limit to be enforced? It could be a percentage of time, or a certain frequency per month, for example. Once you have that behaviour identified you can move on to the next step; finding that number.
With your ratio of stress / normal system behaviour identified, now you can map that against your historical dataset. Is there a particular WIP threshold that will balance the stress ratio? Depending on the nature of your demand this may come easily, but in case the answer is not obvious you can apply best efforts now and tweak things later on (more on that in step 5.)
Finally, once you’ve agreed upon your starting WIP limit your team will then need to agree on how long this experiment will last. Specifically, you want to validate that any changes being made with your WIP are heading in the right direction.
My advice would be to have at least three review sessions in order to establish an early trend. Therefore, if you plan on reviewing your WIP experiment every month, then commit to a 3 month program at the very least before considering a pivot.
4. Measure the results
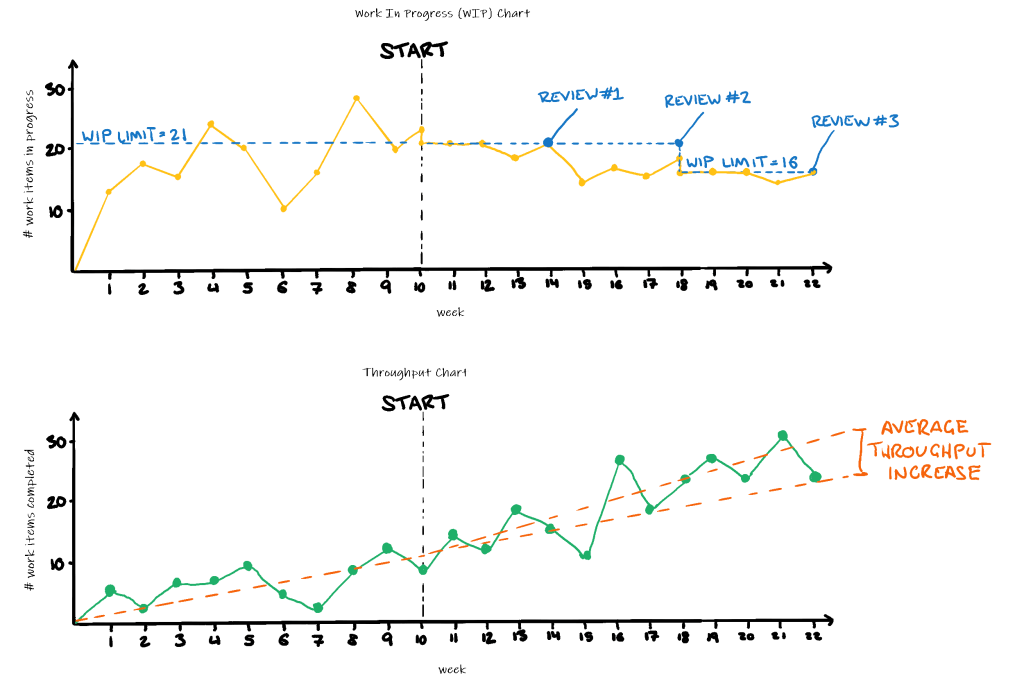
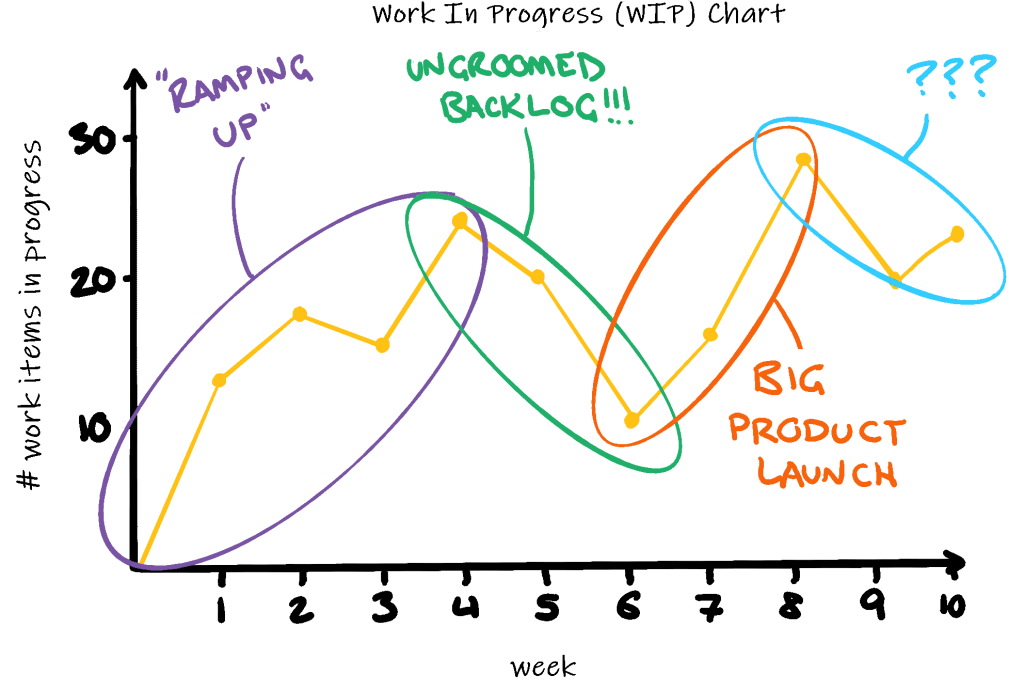
Now for the fun part (at least in my book). If you have some kind of digital board set up (like Jira or Trello, for example) then you can start measuring your WIP immediately by using the out-of-the-box reporting tools, or by accessing the available APIs to create your own. I recommend using the Cumulative Flow Diagram as it provides a holistic view of your supply (work completed) and demand (work requested). If your ‘In Progress’ work smooths out and your ‘Completed’ work starts to increase over time you know you’ve hit the sweet spot from a performance perspective. Conversely, if you are more interested in the cultural wellbeing side of things then you can compliment your results with a simple health survey.
If you don’t have the means to automate the capture of results, then you have two remaining options. First, you could manually record the results, plotting the final stats at the end of each working day. Alternatively, you could only focus on the extremes, and log a diary that records only the days where the WIP limit was hit.
Again, regardless of how you capture your results, make sure you collect enough data points to establish a meaningful trend. Don’t just save it all for the end like a big bang release! Continual measurement leads to continual opportunities to improve.
5. Don’t be afraid to adjust
After you’ve measured enough results to warrant a review session, it’s important to have an in-depth discussion about how the experiment is going. Similar to a retrospective, this is your chance to review the facts and decide whether to pause, pivot or persevere.
It’s rare that a fixed WIP limit can remain relevant over a long time horizon, so don’t hesitate to change things if you’re not getting the right results (backed by your data of course!).
Conclusion
If you’ve read through this article fully, or even just skimmed the highlights, you should hopefully have picked up a few new tips and tricks to get over the fear of starting, and kick off a formal program to throttle the demand in your system of work.
I’d love to hear how your WIP limit experiments are working out. What has your experience been? Have I missed something here that you’d like me to address? Let me know!
Want to enhance your agile reporting?
Are you a Jira user? Check out these apps that focus on themes like dependency management, scaled backlog views and WIP management to help your teams navigate and understand their complex environments!